Sunday, April 24, 2011

Happy Easter!

Growing up, every Easter we would do an Easter hunt on Sunday morning with clues from the Easter Bunny and plenty of candy for everyone. It was a very fun tradition - one I have decided I want to continue with my family.
So last night I printed pictures of places in the house - the washing machine, the computer, the bathtub - and I colored them and wrote a bit of the Easter story on the back. It was rather cheesy and I'm pretty sure it was over Chelsea's head, but it was good. She listened to us read a bit about Christ and Easter and put her eggs in her basket and then we looked at the picture for the next place to find a bit of the story and more eggs.
She had a good time with it. I think I made the hunt a little long. We had 5 spots to find eggs and she was ready to be done after 3. But she made it! And when the hunt was done we scattered the rest of the eggs across the living room floor and she got to do yet another egg hunt! (We did 1 that the apartment management put on, 1 with the ward, and then all the festivities at home. I think we have little plastic eggs coming out our ears!)
Before she went to the hunt at the apartment we PRACTICED finding the eggs and putting them in the basket. Yes. I'm one of those moms. I thought she may need to know what she was supposed to do before all the big kids got all the eggs and she didn't get any. So I grabbed a couple eggs I had ready for today and tossed them in the corners of the living room and helped her "find" them. And then she would dump them out and we would do it again. She did very well at the hunts, but now she thinks that when you have collected your eggs you are supposed to dump them out and do it again! It's the never ending Easter egg hunt! :)
We had a good time this weekend and in spite of the large quantities of candy in the house - that I am NOT going to eat by myself and it will NOT be gone in the next week - I think the Spirit at home is good. Having the Easter story in the middle of the hunt was definitely a good idea.
I hope everyone else is having a wonderful holiday and enjoying being with family.

Friday, February 18, 2011

Valentine's Day Cake: Part 2

So last week I posted all about this fabulous cake that I was going to make. Only problem was that I hadn't made it... therefore, no pictures. Today we have pictures! :)

Ok. So just to refresh everyone's memory (and not to have a post purely of pictures) here are the instructions again with the pictures.

Bake 2 two-layer cakes and freeze them. Bake a red velvet cake and crumble it and mix in 1/2 half of a can of cream cheese frosting.
Use toothpicks to draw a circle on the top of each cake. (Hold center toothpick and rotate outer one.) This makes a guide for the next bit.


Grab a metal heart shaped cookie cutter and make a line on the side of the cutter right in the middle to make sure you don't go too deep or shallow.

On the first cake, cut out the bottom half of the heart, following the circle guide.
On the second cake, cut out the top. Cutting out the heart is a little bit difficult since the cake is frozen, but it is important to be frozen so there are fewer crumbs and the cake holds together better. Also, because it's frozen, it's important to use a metal cutter. Plastic will break.

Remove the part you just cut out.

Fill the cake with red velvet cake and frosting mixture. Press it down so it fills the heart shape.

Frost one of the cakes. I chose to only frost the white part of the cake so there wouldn't be a white line through the heart, but you can do either way.

Put the cake with the top part of the heart on top of the other and frost the outside of the cake.

And viola! You have a heart in every slice! :)


In the end, this is what our Valentine's Dinner looked like and we had the cake for dessert. Everything turned out just like I hoped - even the silly pink milk! I decided to get that just because it made me laugh and I hoped having pink drinks would make Dave laugh too... turns out he LOVES the stuff and was very excited! Dave got me those gorgeous flowers and I made dinner with his favorite food and mine (my spinach lasagna and asparagus) and we watched a silly old movie called Love Potion #9. A wonderful evening.

Thursday, February 3, 2011

Valentine's Day Cake

So there's this tv show (Studio 5) that I like to watch in the mornings, when life permits, and I caught an excellent recipe the other day! I'm so excited to make it. It's a cake that on the outside looks rather boring. Just a plain old white cake. But when you cut into it there is a HEART! in every slice! A pretty, red, scrumptious heart. In the middle of your piece of cake. I just can't get over it.

Now, I don't usually get all into Valentine's Day. I typically think of it as just another stupid commercial "holiday" that gives people the excuse to feel that they deserve to be pampered and spoiled in increasingly ridiculous ways and then get mad when the boy doesn't realize he's are obligated to encourage such silly notions. Or as many of my single friends called it: "Single-Awareness Day." However. This cake may have changed my mind just a little bit.

So the plan is to make lasagna - Dave's favorite dinner - and have this cake for dessert. It'll be fun to see his reaction when he sees the inside.

So how is it done you ask? Well for anyone else that wants to make this fun surprise cake for their honey, here's the to do list. And really it is quite simple. :) All you need is 2 white cake mixes, 1 red velvet cake, 2 toothpicks, a bit of string, and some frosting.

Using the 2 white cake mixes, make 2 two-layer cakes (frosted inbetween but not on the outside) and freeze them. 8 or 9 inch I believe they should be. Then place a toothpick in the middle of the first cake poking out most of the way and place another toothpick about 1/2-1 inch from the edge of the cake. Tie the toothpicks together using floss or string or whatever and hold the middle toothpick in place while drawing a circle all the way around the edge of your cake. It's basically a protractor drawing a circle guide on the top of your cake. Repeat on the other cake.

Now you have 2 two-layer cakes with a circle on top. Grab a METAL heart shaped cookie cutter and draw a line on the side of the cutter with a sharpie about in the middle. On your first cake, use the cutter, buried up to the line on the side, to gouge out the bottom of the heart shape all the way around the cake, using the guide to make sure it's straight. Flip the cutter over and do the top half on the other cake. When you place the second cake upside-down on top of the first cake it makes a heart shaped hole in the middle.

Then you take your red velvet cake - already cooked and crumbled - and you mix in frosting like you would to make a cake pop. Which they suggested you do with the leftovers. Then you shove the red velvet crumbles into the heart shaped hole you made, put the 2 cakes together, frost, and voila! You have a surprise heart cake!

Tuesday, February 1, 2011

A New Hobby

Not too long ago I was looking for a new hobby or two, and I have decided to experiment with baking cakes. And not just any cakes, but fondant cakes. So far I have made 3 full blown cakes and, most recently, some cupcakes. Sadly, I didn't get pictures of the cupcakes since I was over on my deadline. (They were for a girls' night and were all devoured before I got any pictures.) Apparently cutting out 20 little pink and green flip flops freehand takes, well, a while. So you'll just have to imagine cupcakes with flip flops and take my word that they were cute. One thing I particularly liked about them was that I wanted a flip flop in the sand so I rolled out some plain old white fondant and, once it was the right thickness, I sprinkled yellow sugar crystals over it and ran the rolling pin over once or twice more to push them all in and it made wonderful sand!

One thing that I love about making these cakes is that every time I do I learn something new!For example, Cake #1 taught me thata tiny tiny bit of water brushed on the fondant instantly makes it sticky - very useful when adhering flat shapes on to the basic covering. However. Too much water makes the whole piece one sticky, shiny, and unfortunately slightly slimy mess. But it still looked good so I was happy.

With Cake #2 I learned something extremely important. ALWAYS cover a multi-tiered cake individually. Fondant is supposed to be pliable and moldable, right? So make a big enough piece, you should be able to cover both tiers at once, right? The answer to that is a resounding NO. Fortunately, there was a bit of extra fondant so I could mostly fix that mistake and it too turned out pretty well. Thank goodness - that was Chelsea's birthday cake!

Cake #3 was a bit more involved. About this time I decided I really wanted to try a fondant cake. The first too had been so easy! ...or something like that. So I bought a Wilton Signature Wedding Cakes book. I'm absolutely positive I had sniffed a little too much powdered sugar at that point, because I was sure I could make it exactly like the picture in the book. 2 cakes? That practically makes one an expert! And so I got to work.

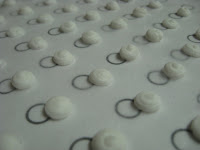
I picked the simplest cake in the book - straight up white, reduce it to 2 tiers, square, covered in fondant with a ribbon around each and some little icing dots on top of the ribbon. Oh yes. And a gumpaste bow the size of my face on the top. Soon I realized this was a much larger project than I anticipated.

Day 1: Make the dots. Dry.

Day 2: Make the fondant. Refridgerate.

Day 3: Make the cakes.Freeze.

Day 4: Make loops for bow. Dry overnight.

Day 5: Make buttercream frosting and assemble!

In the end, I could only see one or two things that would significantly improve my cake. The first is pretty obvious, but I didn't have enough buttercream and I was hoping it would be ok anyway, but here it is: if you don't have enough frosting to fill the sides and make them flat (since my cakes didn't have perfectly straight sides) you will end up with a cake that does not have nice straight sides. Duh. But like I said. Not enough frosting.

The second thing I learned was to use a template. And don't be afraid to thin the frosting. The little frosting dots all needed to be a specific size and all perfectly round and smooth. Once I thinned my royal icing and made a template (a bunch of circles printed on a paper - underneath the wax paper I was piping onto) it was easy-peasy. :) Cake #3 turned out to be a bigger project than I expected - 4 days may be a little excessive - but I had fun and it was only a week later that I started having a hankering to make another one. (That's where the cupcakes came in.)

So that is my new adventure/hobby of late. And so far I am still enjoying every bit of it. I'm hoping to take a Wilton class at JoAnn's and maybe even volunteer/work in a bakery to learn a little more since everything I know is from the internet and trial and error. A fun process, to be sure, but maybe someday I can decorate cakes for other people if I can figure out how to do it well. But for having done only 3 cakes, I'm thinking it's going well! :)