Not too long ago I was looking for a new hobby or two, and I have decided to experiment with baking cakes. And not just any cakes, but fondant cakes. So far I have made 3 full blown cakes and, most recently, some cupcakes. Sadly, I didn't get pictures of the cupcakes since I was over on my deadline. (They were for a girls' night and were all devoured before I got any pictures.) Apparently cutting out 20 little pink and green flip flops freehand takes, well, a while. So you'll just have to imagine cupcakes with flip flops and take my word that they were cute. One thing I particularly liked about them was that I wanted a flip flop in the sand so I rolled out some plain old white fondant and, once it was the right thickness, I sprinkled yellow sugar crystals over it and ran the rolling pin over once or twice more to push them all in and it made wonderful sand!
One thing that I love about making these cakes is that every time I do I learn something new!For example, Cake #1 taught me thata tiny tiny bit of water brushed on the fondant instantly makes it sticky - very useful when adhering flat shapes on to the basic covering. However. Too much water makes the whole piece one sticky, shiny, and unfortunately slightly slimy mess. But it still looked good so I was happy.


With Cake #2 I learned something extremely important. ALWAYS cover a multi-tiered cake individually. Fondant is supposed to be pliable and moldable, right? So make a big enough piece, you should be able to cover both tiers at once, right? The answer to that is a resounding NO. Fortunately, there was a bit of extra fondant so I could mostly fix that mistake and it too turned out pretty well. Thank goodness - that was Chelsea's birthday cake!

Cake #3 was a bit more involved. About this time I decided I really wanted to try a fondant cake. The first too had been so easy! ...or something like that. So I bought a Wilton Signature Wedding Cakes book. I'm absolutely positive I had sniffed a little too much powdered sugar at that point, because I was sure I could make it exactly like the picture in the book. 2 cakes? That practically makes one an expert! And so I got to work.
 I picked the simplest cake in the book - straight up white, reduce it to 2 tiers, square, covered in fondant with a ribbon around each and some little icing dots on top of the ribbon. Oh yes. And a gumpaste bow the size of my face on the top. Soon I realized this was a much larger project than I anticipated.
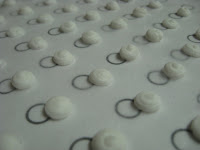 Day 1: Make the dots. Dry.
Day 2: Make the fondant. Refridgerate.
 Day 3: Make the cakes.Freeze.
 Day 4: Make loops for bow. Dry overnight.
Day 5: Make buttercream frosting and assemble!


In the end, I could only see one or two things that would significantly improve my cake. The first is pretty obvious, but I didn't have enough buttercream and I was hoping it would be ok anyway, but here it is: if you don't have enough frosting to fill the sides and make them flat (since my cakes didn't have perfectly straight sides) you will end up with a cake that does not have nice straight sides. Duh. But like I said. Not enough frosting.
The second thing I learned was to use a template. And don't be afraid to thin the frosting. The little frosting dots all needed to be a specific size and all perfectly round and smooth. Once I thinned my royal icing and made a template (a bunch of circles printed on a paper - underneath the wax paper I was piping onto) it was easy-peasy. :) Cake #3 turned out to be a bigger project than I expected - 4 days may be a little excessive - but I had fun and it was only a week later that I started having a hankering to make another one. (That's where the cupcakes came in.)
So that is my new adventure/hobby of late. And so far I am still enjoying every bit of it. I'm hoping to take a Wilton class at JoAnn's and maybe even volunteer/work in a bakery to learn a little more since everything I know is from the internet and trial and error. A fun process, to be sure, but maybe someday I can decorate cakes for other people if I can figure out how to do it well. But for having done only 3 cakes, I'm thinking it's going well! :)


2 comments:
Those are cute! I'll have to remember that about layered cakes: I've never done one with layers. The pattern is a great idea too.
I see you've got your little flattener out, in the picture of you, which I like. But I also like to use my little scrapers - like the one that came with that pizza stone you used to have. Those are great for shaping fondant.
Also: shape of the pan makes a difference. Wilton pans are nice because the sides of the pan are already straight: no need to fix.
Tip #3: I love the book "The Well-Decorated Cake." In there, there's a recipe for what I call "cake putty." Andy likes to call it "cake spackle." Works just the same as the stuff on the wall, only much tastier. Take the crumbs from when you cut the top off to flatten your cake, and smash them up. Mix in a little bit of the jam of your choice. Strawberry is my favorite. And then mix in a bit of your buttercream frosting. It should be thick, but spreadable. It's great stuff! Fixes any holes, covers and seals crumbs, and tastes great. And, if your cake is tiered or so perfect you don't need much to fix it, you can use it for a filling between the layers, and people will never guess what it is!
They look awesome! I'm impressed :)
Thanks for the pictures!
Post a Comment